

Guide for vets for taking quality photos of eyes
- Pictures of the affected eye from different angles
- 3-6 pictures of each affected eye
- Use your smartphone with the flash on
- Minimise other room lighting as much as possible
- Relevant clinical information and treatments used


The different angles
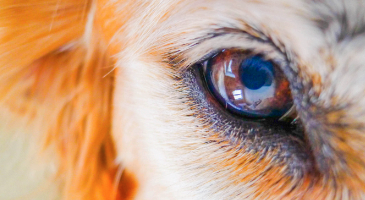
1. From the front: Head of the patient, including ears and muzzle
2. From the top: Head of the patient, including ears and muzzle (only if orbital disease is suspected, see following slide)
3. Directing the phone from dorsal to ventral: Affected eye
4. Directing the phone from ventral to dorsal: Affected eye
5. Directing the phone from the lateral canthus: Affected eye
NB. Use a bright light (smartphone flash can be too much, sometimes is best to dim it with some layers of white paper)

1) Head - from the front

2) From top - only if orbital disease is suspected. No need to be anaesthetised

3) Positioning the smartphone slightly from dorsal to ventral - picture with direct illumination


4) Positioning the smartphone slightly from ventral to dorsal will lead to a picture with some retroillumination


5) Take a picture from the lateral canthus of the affected eye


Understanding why these different angles are needed
We need to use direct light as well as retroillumination to be able to see different structures. This is the reason for pictures number 3 (direct illumination) and 4 (retroillumination to some degree).

Below we show why this angulation highlights with the fundic reflex, changes within the eye, that are not visible with direct illumination.
Direct Illumination versus Retroillumination
Taking pictures at different angles is needed, because direct light, as well as retroillumination, is necessary in order to see different structures. This is the reason for picture number 3 (direct illumination) and 4 (retroillumination to some degree).
The following image depicts why this angulation will highlight, with the fundic reflex, some changes within the eye, not visible with direct illumination.

We hope this guide is useful and will help you in mastering eye photography for specialist case advice. Providing 3-6 pictures of the patient really helps us to help you with the case. We will provide advice based on the information and the pictures sent. Please let us know if any questions arise or any areas need further clarification.

Explore more
Aug 29, 2024 12:00:00 AM
VET.CT Champions Radiation Safety through Global Campaign
VET.CT has launched a campaign to raise awareness about the importance of radiation safety in...
Read more-2.png)
Aug 29, 2024 12:00:00 AM
VET.CT Position Statement: AI in veterinary radiology
VetCT Position Statement: AI in veterinary radiology Overview: VetCT believes that the advent of...
Read more